Class 6 Off Road Race Truck D-50 build out. Chevy. 4.3L V6

A place to post a build thread for your 1st Gen truck.
(1979-1986)
Forum rules
Please look carefully at all the Sub Categories and place your question in the most appropriate Sub Category for faster replies. Thank you and enjoy your time here.

Re: D-50 build out. Sacramento Ca. 4.3L V6

Postby camoit » Sun Jul 04, 2010 12:00 am

I guess it’s time for an update. The temperature is a warm 98 today. So I will just get caught up on the build until it cools off. The main part of the cabin is near complete. I have the seat mounting bars set in place, and the seat belt bars are in. For the guys that want to use a 5-point harness in your truck there are basic things to keep in mind about belts. First use a 3-inch belt. Avoid the 2-inch belt at all cost. They can do more damage to you in an accident then the stock belt. It comes down to simple weight distributions. The more surface the better. A 2-inch belt will bend into taco shape and now you have a ¼ inch rope for a belt. Not a good feeling. This is why they have banned them in nearly all forms of racing. Second DO NOT mount the shoulder belts above the Scapula of your back, Or shoulder blades. If it is to high then you can crack your spinal cord or sever your head during a crash. This would make for a good story on the 5 PM news. Head flies off during roll. Witness says, it looked like he said “holey shit” as it flue over. During a crash you can experience up to 165Gs of force. So keep in mind a seatbelt must not be pinched or have anything that can cut it with in 2 inches of it at all times. You should also think about the direction of forces applied to it. Keep bends and curves flowing not sharp.

Image

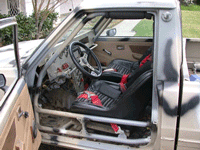
Now here is the main cab structure with some gussets installed. The cross bracing has yet to be installed. So far I have used 60 feet of 1 ½ inch .095-wall tubing and 20 feet of .120 wall tubing just to get this far.

Image

I have had a couple of people ask what it takes to build a good roll cage. Well here I go.
If you want to build a cage for your truck there is some tools you will need. First is the welder. Go out and find a good 220 Volt mig welder. You can use Argon Co2 mix or just Co2. Don’t use flux core. Straight Argon is for Aluminum I have used Co2 for many years and have just become accustom to how it works. A large tank can last me up to 10 years or more at home. I just replaced one of my tanks after 15 years of use. It went through 5 of the big rolls of .030 wires. Co2 burns hotter than Argon mix and you can burn through thin wall steel. It just takes time to get good. I will get into welding later on.

Image

Now you need to find a mandrel bender. DO NOT get a pipe bender. There are some ratcheting low cost ones that work OK and make nice bends. You can find them here.

http://www.tubing-benders.com/?gclid=CPzR3ZyCv6ICFQ4iawod4Gxx3A

But if you really want to do the job right then you can expect to spend around 1200 bucks for a good quality tool. Here is a good source for tools and lots of other things you will need to do the job. Keep in mind if you buy something good you only need to buy it once. They still make and sell the tools I picked up back in 1997. You can get a low buck tubing notcher.
http://www.irvansmith.com/scart/index.php

Image

Now when it comes to tools you get what you pay for. I have spent the last 20 years filling up my box. Yard sales, auctions things like that. I set a goal and then collect parts until I have enough to get going on it. Here is my garage and some supplies that people have tossed out that I have found over the years. My nut and bolt collection was a major score.

Image
Image
Image
Image
Image

Now lets talk a little about welding.

Image

"When welding tubing you need to keep an eye on the fit of the tubing." If you have a large gap then you will “burn through” You can fill the gap but it takes time and every time you start and stop the fusion of the metal you take a chance of O2 getting into the weld and producing a pimple or “zit hole”. If you have the gas flow up to high wile using Co2 you can over heat the steel. I run around 12 Cubic Inch Hour. At this rate I can get a good Spray of metal. There are times when it can be an advantage to use a Globular transfer method, manley when filling a large gap between to parts. If the gap is large or the parts are thin there is the option to noodle weld.
Image
Image

Make the fit on your tubing as tight as you can. Spend the extra time and do it right, there is no shortcut in frame building. Remember the forces that will be applied to the cage.

Image
Image
Image
Here is my BUILD THREAD.
Live Class 6 off road race truck build. CLICK HERE FOR FEED.

http://www.onsiteconcrete.net
User avatar
camoit
Admin
Admin
 
Posts: 565
Joined: Thu Feb 18, 2010 11:22 pm
Location: Sac, Ca.
Engine Size: 2.6L
What year vehicle do you own?: 1980

Re: D-50 build out. Sacramento Ca. 4.3L V6

Postby camoit » Wed Jul 07, 2010 9:43 pm

Let’s talk about getting heads ported. My heads have been ported and are ready to be assembled. You will have many people tell you about valve seats and angles. 1,2, or 3 angle grinds. But when you look to improve performance you only need to look as far as the first 2 inch down the ports. Most improvement to air flow is right below and next to the valve. The head on my engine is within .020 of the intake gasket hole and the intake manifold porthole. When it comes to porting a head you need to open up the area right below the valve seat. The exhaust valve seat and valve has a radius seat. Not an angle cut. This allows for better flow of gas out of the combustion chamber. The intake has a 3-angle grind. This allows for a better seal so combustion gases can’t escape into the intake and cause a backfire.

Image
Image
Image

One thing I have seen people do is put larger valves in to a head. This can create larger problems and is more costly to do. The only time you need larger valves is if you are building a blown engine or top fuel car. But if you are dead set on larger valves then just go out and pick up heads that are built with them. It will save you in the end. One thing you should do is look to see how close the valve is to the wall of the combustion chamber. On some heads the valve is very close. So by just clearance that area you can greatly improve the flow. Here is a head that has been clearanced to allow for greater flow. It was opened up by .050 that may not seem like a lot but when you deal with 1000s of an inch it is a lot.

Image
Image
Here is my BUILD THREAD.
Live Class 6 off road race truck build. CLICK HERE FOR FEED.

http://www.onsiteconcrete.net
User avatar
camoit
Admin
Admin
 
Posts: 565
Joined: Thu Feb 18, 2010 11:22 pm
Location: Sac, Ca.
Engine Size: 2.6L
What year vehicle do you own?: 1980

Re: D-50 build out. Sacramento Ca. 4.3L V6

Postby camoit » Wed Aug 04, 2010 10:18 pm

Rear frame is now DONE..........

Image
Here is my BUILD THREAD.
Live Class 6 off road race truck build. CLICK HERE FOR FEED.

http://www.onsiteconcrete.net
User avatar
camoit
Admin
Admin
 
Posts: 565
Joined: Thu Feb 18, 2010 11:22 pm
Location: Sac, Ca.
Engine Size: 2.6L
What year vehicle do you own?: 1980

Re: D-50 build out. Sacramento Ca. 4.3L V6

Postby supadupadennis » Sun Aug 08, 2010 11:15 pm

http://www.youtube.com/watch?v=Mqjs_K23lFM

91 mitsubishi mighty max 4x4
chevy 4.3 new edelbrock carb, 2in body lift, 3in lift shackles, 36.5 grand prix,

sooooo sick
User avatar
supadupadennis
Member
Member
 
Posts: 4
Joined: Sun May 17, 2009 3:45 pm

Re: D-50 build out. Sacramento Ca. 4.3L V6

Postby Spicoli » Mon Aug 09, 2010 2:51 pm

Pretty sure that trucks from that hillbilly sumbitch from alabama that was on MD50.... he had a black truck on 33s with a 3.0 in it and a mismatched grillguard when I seen it last
--keRby

LethalEthan wrote: I wish I had 10 exhaust pipes, I bet that shit flows like LL Cool J


Ad Inexplorata
User avatar
Spicoli
VIP
VIP
 
Posts: 383
Joined: Sun Apr 19, 2009 8:21 am
Location: KS

Re: D-50 build out. Sacramento Ca. 4.3L V6

Postby camoit » Tue Aug 10, 2010 12:01 am

That thing sounds like he dropped in some big rv cam then added the mainfold and the new carb.

The machine shop started on my engine today BUT then they called me to confirm some information. The final decisions are are now made for the engine. 500 cfm carb. 6000 RPM redline. 6800 RPM free spin. Revlimiter set to 5700 RPm. Power band from 1500 RPM to 5000 RPM. Now with that change the cam profile changed from the first idea of using fuel injection. Larger selection of cams. So now with the new cam comes diferant roler lifters. Diferant valve springs. And gear drive. ARP head studs and rod bolts. 7 QT oil pan. Millings high volume oil pump. I don't want to spend another $4200 to dry sump it. But that would give me another 50 HP and push it to 400 HP. 27 LB lightend fly wheel. Flat top pistons 9.7 to 1 compression. Port and polish job, Raidous exhuast valve grind, 3 angle intake grind. Mainfold port and angle matching. Roler rockers. Custom leingth chrome alloy push rods. I will put together a full speck sheet when the engine is done along with a price sheet.
Here is my BUILD THREAD.
Live Class 6 off road race truck build. CLICK HERE FOR FEED.

http://www.onsiteconcrete.net
User avatar
camoit
Admin
Admin
 
Posts: 565
Joined: Thu Feb 18, 2010 11:22 pm
Location: Sac, Ca.
Engine Size: 2.6L
What year vehicle do you own?: 1980

Re: D-50 build out. Sacramento Ca. 4.3L V6

Postby camoit » Mon Aug 16, 2010 10:27 pm

Image
Here is my BUILD THREAD.
Live Class 6 off road race truck build. CLICK HERE FOR FEED.

http://www.onsiteconcrete.net
User avatar
camoit
Admin
Admin
 
Posts: 565
Joined: Thu Feb 18, 2010 11:22 pm
Location: Sac, Ca.
Engine Size: 2.6L
What year vehicle do you own?: 1980

Re: D-50 build out. Sacramento Ca. 4.3L V6

Postby camoit » Thu Sep 02, 2010 11:13 pm

Time for the engine update now that’s it’s built.

Here is my engine builder Glenn Hutchison. He has been working for his dad and building race engines for nearly 30 years.
The business is located in Sacramento Ca. If you want to have them build you an engine don’t be in a hurry. The big race engines come first unless that’s what you want and can spend. They can be reached at 916-483-9563.

Image

They have engines shipped to them from all around the globe to be built up. They curently have 4 big blocks in from Australia. They run around $80,000 to rebuild. Since I didn’t have that kind of cash to burn I just let them do there thing at there owne speed. It shows in the work they do. My block was clean enough you could eat off of it.

Image


Here is the long awaited engine specifications for the Chevy 4.3 L V6.
I used a 1992 GMC Jimmy 4.3L V6 early model block. No counter shaft on the early model blocks. The heads are 1997 vortek heads.

We will start off by telling you that the exhuast valves have a radious cut. This improves the flow. The pocketes have been ported and polidhed out. The intake and heads have been port matched. The intake flange angles have been matched to the heads. The intake valves now have a 3 angle grind.


Image

Image


Specifications:
Comp Cam
Part Number: 09-430-8 Grind Number: C43 280H-R10
Lifter Type: HYD. Roller
Engine Family: Chevrolet 4.3 liter 262 c.i. 90° 6 CYL. 1980-1997
Description: Hydraulic Roller-Limited high performance street use. Needs intake, headers & stall, 3.73 to 4.10 gears. Mild rough idle.
Cam Family: Magnum™ 1987-Present Originally Equipped With Hydraulic Roller Camshafts, NON-BALANCE SHAFT
Specifications
RPM Range: 2000 to 5500
Valve Timing: 0.006
Lobe-Center Angle: 110
Intake Centerline: 106

Intake Exhaust
Valve Lash: HYD. HYD.
Duration: 280 280
Duration @ .050" Lift: 224 224
Valve Lift: 525 525
Lobe Lift: 352 352
Valve Timing @ 0.006 Lift:
Exhaust Closes 26 ATDC Opens 74 BBDC
106 Centerline
Intake 34 Opens BTDC 66 Closes ABDC


Comp Cam Race Roler lifters.
PRW 350 Stainless Steel Roler Rockers.

Image
Image


Block Bore Dia. 4.030.
Cam Gear Drive.

Image


Crank Saddle Bore Dia. 2.641.
Federal Mogul TWR Forged Piston.

Image


Chamber VOL. 62cc.
Comp Ratio 10.1:1.
Rings Perfect Circcle 40564 CP .030.
Rods are stock.
Duel Head Springs MFG.Ed Iskenderian #6005.
135 LBS. Press.
ARP Rod Bolts and Head Studs.


Image


Edelbrock Intake #2111.
Edelbrock Carb 650 CFM 4 barrel EDL-1806.
Edelbrock Carb Spacer # 9266.

MSD #6430 Ignition MSD 6TN/6ALN NASCAR CD Ignitions.
MSD #8597 Ignition – MSD Pro-Billete Distributors.
MSD #8680 – MSD Adjustable Timing Control.
MSD #8252 Ignition Coil, Blaster HVC, E-Core, Square, Epoxy, Blue, 42,000 V,

Champ Oil pan.
Millings High Volume Oil Pump.
HP 350.


Image

Image
Here is my BUILD THREAD.
Live Class 6 off road race truck build. CLICK HERE FOR FEED.

http://www.onsiteconcrete.net
User avatar
camoit
Admin
Admin
 
Posts: 565
Joined: Thu Feb 18, 2010 11:22 pm
Location: Sac, Ca.
Engine Size: 2.6L
What year vehicle do you own?: 1980

Re: D-50 build out. Sacramento Ca.

Postby camoit » Wed Sep 08, 2010 1:11 pm

MaxD50 wrote:
mikewarme wrote:
camoit wrote:Well as for the 4X4 tranys if I would have found this site 4 weeks ago I could have had 2 complete power rams. My concrete yard has a tow company there and they just off loaded them to the wrecking yards or scrappers. I don’t know where they went. At the time I had not made up my mind to on what I was going to do with my truck. They were diesel powered. It took some time but I did get my truck out.
Image


Now you look here Boy...... Them diesels are worth REAL good money even not running or rusty. You find out where they went please!


Now you look here boy...you better sell me them mirrors off the camo truck , if you should ever decide to get rid of the truck.


Golly,,, I don't think I like your tone - - - So if I do sell them, it wont be to you. So NA NA NAAAA,, NA NAAAA, NA,,,, From what I have been told I gave them to some guy in Canada I never met or talked to. He is going holding his breath until they show up on his door. But that is news to me.. PS: If you wanted mirrors like that, you should have paid for the "Sport Package" back in 1980 I did,,, ya cheep bastard..... :)
Here is my BUILD THREAD.
Live Class 6 off road race truck build. CLICK HERE FOR FEED.

http://www.onsiteconcrete.net
User avatar
camoit
Admin
Admin
 
Posts: 565
Joined: Thu Feb 18, 2010 11:22 pm
Location: Sac, Ca.
Engine Size: 2.6L
What year vehicle do you own?: 1980

Re: Class 6 Off Road Race Truck D-50 build out. Sac. Ca. 4.3

Postby camoit » Tue Oct 05, 2010 9:56 pm

I have the parking brake nearly finished. You have no Idea how hard it is to to convert a 97 Isuzu Rodeo cable to a 1979 D-50 hand brake and have it comply with fedral law so it will pass inspection later on to finish the DMV registration stuff. Pictures and wright up is comming soon.
Here is my BUILD THREAD.
Live Class 6 off road race truck build. CLICK HERE FOR FEED.

http://www.onsiteconcrete.net
User avatar
camoit
Admin
Admin
 
Posts: 565
Joined: Thu Feb 18, 2010 11:22 pm
Location: Sac, Ca.
Engine Size: 2.6L
What year vehicle do you own?: 1980

PreviousNext

Return to 1st generation


Who is online

Users browsing this forum: No registered users and 1 guest

cron