With mightyD50 gone, I'm resurrecting my 2.6 turbo swap project thread. I'll update and add excerpts from the old thread. I'll also add how to's that I did on my truck.
Here's my current mods:
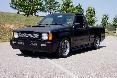
2.6 turbo motor w/ Balance shaft and jet valve elimination kit
Stock 12A turbo @ 8psi
2.5” downpipe
Mazda Turbo II RX-7 top mount intercooler
1gen DSM BOV
DSM K&N air filter
Relocated battery, powersteering reservoir, charcoal canister & radiator overflow bottle
Tuck wire harness
Taurus electric radiator fan
Mitsubishi Van 75amp alternator
3” catback exhaust
2” drop spindles
3” lowering blocks
5-lug Toyota hub conversion
Polyurethane bushings
Rear swaybar
Montero LSD
Custom front bumper
Custom grill
WRX hood scoop
Custom rocker panels
Starion wheels
Tach cluster w/ 94 cluster bezel
Air/fuel, boost & fuel pressure gauges
Nissan Sentra SE-R bucket seats
Black Satin paint
Delta storage/tool box
Truck cost: $300 (bought in 2006)
Project costs: $922
Total costs: $1222
See sig for my swap info:
2.6 (g54b) turbo swap project thread
48 posts
• Page 1 of 5 • 1, 2, 3, 4, 5
2.6 (g54b) turbo swap project thread
![]() by TurboMax » Sat Jul 11, 2009 8:07 pm
by TurboMax » Sat Jul 11, 2009 8:07 pm
Last edited by TurboMax on Fri Jul 17, 2009 5:44 pm, edited 3 times in total.
-
TurboMax - Member

- Posts: 136
- Joined: Sun Jun 28, 2009 6:33 am
- Engine Size: 2.6T
Re: 2.6 (g54b) turbo swap project thread
![]() by TurboMax » Sat Jul 11, 2009 8:38 pm
by TurboMax » Sat Jul 11, 2009 8:38 pm
Back in the spring of 2005, I started parting out a running Starion/Conquest since the undercarriage was rusting out badly. I had a buyer for the turbo motor, but after 6 months of waiting for him to pick it up, I started looking for a donor vehicle to do the turbo motor swap. After several months of looking, I ended up finding a 1990 D50 2wd short bed with a 2.4L motor which I was able to buy for only $300 in 2006. It was an abandoned project that ran rough with a trashed interior, but came with an aluminum truck cap, bedliner, new hood, new fender, new rebuilt ecu, new battery and couple boxes of parts.
First thing I did was strip the interior, repainted the dash, redo the door panels, replace the carpet and replace the seats with bucket seats from a 94 Nissan Sentra SE-R. I also replaced the stock truck steering wheel with the Starion steering wheel. I then checked, cleaned, and timed the motor and was able to getting it running perfectly. Drove it for several months as my daily driver while I prepped the 2.6 turbo motor for the swap.
Since I already had a Turbo II Mazda RX-7 top mount intercooler and no longer had the Starion intercooler, I decided to run a TMIC for my setup. It’s smaller then the Starion intercooler, but I was only planning on running 8psi boost. After taking several measurements the TMIC should easily fit under the stock truck hood. With the motor on the engine stand, I mounted the IC and fabricated brackets and IC pipes for the motor. In using a TMIC the intercooling pipes were simple and short. The IC to TB pipe was only a few inches long and the turbo to IC pipe was basically a “U” bend which I made from 2 Starion IC tubing. I was able to weld a DSM BOV to the “U” bend IC pipe. I then cleaned up, painted and replaced some gaskets on the motor. The oil pressure switch from the 2.4L motor was also installed and I kept the Starion temperature sensors.
01-26-07
Installed a Engine Diagnostics LED for some troubleshooting. Here’s what I did.
Need:
12v panel mount LED
on/off switch and some wire
I mounted the LED and wired the ground of the LED to the black wire on the OBD connector and the positive side of the LED goes to the on/off switch and the switch to the yellow wire on the OBD connector. Now with the switch in the on position, when you turn the ignition the LED will flash out the codes from the ECU.
04-13-07
Installed some aftermarket Air/Fuel, fuel pressure, and boost gauges.
4/21/07
I pulled the 2.4 engine and the whole wire harness.
I ended up taking the whole harness out since both the drivers side and passenger side harnesses are connected on 1990 models. I'll seperate the 2.4 ecu harness for the front chassis harness and then reinstall the drivers side harness.

4/22/07
I relocated the battery to the pass side firewall. This mod required modifying the brake line and hammering the fender a tad. Of course, a battery tray and brackets were made. I also mounted the turbo heat shield.

4/24/07
I finished reinforcing the firewall for the clutch cable. I believe much of the flex in the firewall is due to the spot welds weakening due to fatigue over time.


I was also able to mount the oil cooler. I had to make a few bends to get the oil cooler lines to fit behind the grill and modified the starion oil cooler bracket. I basically flatten out a bend in the bracket and used a small "L" bracket to attach the top of the bracket to the hood latch and I drilled a hole at the bottom bracket and bolted to a existing bolt hole in the frame. I ran the lines through the same hole the AC lines go.

First thing I did was strip the interior, repainted the dash, redo the door panels, replace the carpet and replace the seats with bucket seats from a 94 Nissan Sentra SE-R. I also replaced the stock truck steering wheel with the Starion steering wheel. I then checked, cleaned, and timed the motor and was able to getting it running perfectly. Drove it for several months as my daily driver while I prepped the 2.6 turbo motor for the swap.
Since I already had a Turbo II Mazda RX-7 top mount intercooler and no longer had the Starion intercooler, I decided to run a TMIC for my setup. It’s smaller then the Starion intercooler, but I was only planning on running 8psi boost. After taking several measurements the TMIC should easily fit under the stock truck hood. With the motor on the engine stand, I mounted the IC and fabricated brackets and IC pipes for the motor. In using a TMIC the intercooling pipes were simple and short. The IC to TB pipe was only a few inches long and the turbo to IC pipe was basically a “U” bend which I made from 2 Starion IC tubing. I was able to weld a DSM BOV to the “U” bend IC pipe. I then cleaned up, painted and replaced some gaskets on the motor. The oil pressure switch from the 2.4L motor was also installed and I kept the Starion temperature sensors.
01-26-07
Installed a Engine Diagnostics LED for some troubleshooting. Here’s what I did.
Need:
12v panel mount LED
on/off switch and some wire
I mounted the LED and wired the ground of the LED to the black wire on the OBD connector and the positive side of the LED goes to the on/off switch and the switch to the yellow wire on the OBD connector. Now with the switch in the on position, when you turn the ignition the LED will flash out the codes from the ECU.
04-13-07
Installed some aftermarket Air/Fuel, fuel pressure, and boost gauges.
4/21/07
I pulled the 2.4 engine and the whole wire harness.
I ended up taking the whole harness out since both the drivers side and passenger side harnesses are connected on 1990 models. I'll seperate the 2.4 ecu harness for the front chassis harness and then reinstall the drivers side harness.
4/22/07
I relocated the battery to the pass side firewall. This mod required modifying the brake line and hammering the fender a tad. Of course, a battery tray and brackets were made. I also mounted the turbo heat shield.
4/24/07
I finished reinforcing the firewall for the clutch cable. I believe much of the flex in the firewall is due to the spot welds weakening due to fatigue over time.
I was also able to mount the oil cooler. I had to make a few bends to get the oil cooler lines to fit behind the grill and modified the starion oil cooler bracket. I basically flatten out a bend in the bracket and used a small "L" bracket to attach the top of the bracket to the hood latch and I drilled a hole at the bottom bracket and bolted to a existing bolt hole in the frame. I ran the lines through the same hole the AC lines go.
Last edited by TurboMax on Mon Jul 13, 2009 8:22 pm, edited 1 time in total.
-
TurboMax - Member
- Posts: 136
- Joined: Sun Jun 28, 2009 6:33 am
- Engine Size: 2.6T
Re: 2.6 (g54b) turbo swap project thread
![]() by Johnboy72 » Sun Jul 12, 2009 6:00 am
by Johnboy72 » Sun Jul 12, 2009 6:00 am
Cool, I remember that thread. My neighbor is going to build up my motor when I go to Iraq. I'm gonna convince him to check out www.g54b.com for info and stuff. Just wished I could have got the ECU and wiring off the donor car before my buddy scrapped it!
-

Johnboy72 - VIP

- Posts: 393
- Joined: Wed May 06, 2009 8:36 pm
- Location: Ft. Stewart, GA
Re: 2.6 (g54b) turbo swap project thread
![]() by TurboMax » Mon Jul 13, 2009 8:29 pm
by TurboMax » Mon Jul 13, 2009 8:29 pm
05-04-2007
I got the wire harness installed and the engine bay has also been painted.

05-11-2007
I dropped in the engine. Here are some pics.

I tucked both wire harness inside the fenders, here's the driverside.

Passengerside

I relocated the reservoir since the turbo heat shield was in the way. The MM stock power steering
pump fits into the stock starion bracket, but the rubber line will have a 90deg bend since it sits
lower then the 2.4 motor.

I am going to use the stock 2.4 AC compressor since the AC system still had Freon, but the AC compressor clutch does not match up with the pulleys. I used the alt./AC bracket from a 1987-89 2.6 MM. I also had to cut the battery tray about 2.5”. I already relocated the battery, I’m not sure if the stock battery will still fit. Also, notice the bend in the AC hose due a different position


Here is the brake booster vacuum hose. The original location on the starion is on top of the manifold, but due the position of the nipple on the brake booster, I moved the location to the back of the manifold. This port was used on the starion for the cruise control, which I don’t have anyway. I used a 90deg adapter and was able to use the stock MM hose. I also had to plug the other port. I also installed brake booster check valve.

I left the starion oil pressure sender in place since I plan on replace my stock instrument cluster with a Tach cluster which also has a oil pressure gauge. I went ahead and took the oil pressure switch from the 2.4 motor and installed it on the 2.6 in an unused oil port just about the power steering pump.

05-24-2007
I made a downpipe using the starion pre-cat flange. I cut off the flange from the pre-cat and
welded a 2.5” piece of exhaust tubing and tied into the stock truck exhaust.


Also, here’s a pic of the extended throttle cable bracket.

For the air intake I used a 1g DSM K&N air filter with the stock Starion air can lid. I slightly modified the clips to hold the air filter and made brackets to mount the air can lid.

And finally.....here’s a pic of the new engine compartment.

06-30-2007
I was able to mount the hood scoop and shaving the stock bumper.

Here's my custom bumper I've been working on. I used the stock bumper and attached the stock valance to the bumper. I welded the stock valance, but had to cut in the middle and make a filler panel. I also had to extend the sides on both sides. After I welded everything up, I filled the gaps with bondo and did a little shaping.


Here's my bumper painted and mesh added. I also modified my front grill. It's hard to tell from the pic, but I used stainless steel mesh with holes in it and NOT the cheap stuff from home depot.

I got the wire harness installed and the engine bay has also been painted.
05-11-2007
I dropped in the engine. Here are some pics.
I tucked both wire harness inside the fenders, here's the driverside.
Passengerside
I relocated the reservoir since the turbo heat shield was in the way. The MM stock power steering
pump fits into the stock starion bracket, but the rubber line will have a 90deg bend since it sits
lower then the 2.4 motor.
I am going to use the stock 2.4 AC compressor since the AC system still had Freon, but the AC compressor clutch does not match up with the pulleys. I used the alt./AC bracket from a 1987-89 2.6 MM. I also had to cut the battery tray about 2.5”. I already relocated the battery, I’m not sure if the stock battery will still fit. Also, notice the bend in the AC hose due a different position
Here is the brake booster vacuum hose. The original location on the starion is on top of the manifold, but due the position of the nipple on the brake booster, I moved the location to the back of the manifold. This port was used on the starion for the cruise control, which I don’t have anyway. I used a 90deg adapter and was able to use the stock MM hose. I also had to plug the other port. I also installed brake booster check valve.
I left the starion oil pressure sender in place since I plan on replace my stock instrument cluster with a Tach cluster which also has a oil pressure gauge. I went ahead and took the oil pressure switch from the 2.4 motor and installed it on the 2.6 in an unused oil port just about the power steering pump.
05-24-2007
I made a downpipe using the starion pre-cat flange. I cut off the flange from the pre-cat and
welded a 2.5” piece of exhaust tubing and tied into the stock truck exhaust.
Also, here’s a pic of the extended throttle cable bracket.
For the air intake I used a 1g DSM K&N air filter with the stock Starion air can lid. I slightly modified the clips to hold the air filter and made brackets to mount the air can lid.
And finally.....here’s a pic of the new engine compartment.
06-30-2007
I was able to mount the hood scoop and shaving the stock bumper.
Here's my custom bumper I've been working on. I used the stock bumper and attached the stock valance to the bumper. I welded the stock valance, but had to cut in the middle and make a filler panel. I also had to extend the sides on both sides. After I welded everything up, I filled the gaps with bondo and did a little shaping.
Here's my bumper painted and mesh added. I also modified my front grill. It's hard to tell from the pic, but I used stainless steel mesh with holes in it and NOT the cheap stuff from home depot.
-
TurboMax - Member
- Posts: 136
- Joined: Sun Jun 28, 2009 6:33 am
- Engine Size: 2.6T
Re: 2.6 (g54b) turbo swap project thread
![]() by TurboMax » Mon Jul 13, 2009 8:56 pm
by TurboMax » Mon Jul 13, 2009 8:56 pm
09-25-2007
I've completely redid the front suspension with drop spindles, Toyota front 5-lug conversion, new shocks, urethane bushings, and new calipers.
Here's what I did for my Toyota front 5 lug swap swap.
Needed Reused Parts:
MM/D50 brake dust shield
MM/D50 spindle nuts & washers
Toyota hub dust cap
Toyota bolts for rotor
Parts Needed: Cost: Notes:
2 – Toyota 5-lug front hubs, dust caps, bolts for rotors $23.42 Salvage yard (from pre-95 2wd pickup)
2 – Toyota Tacoma (95-97) Front Rotors $31.98 Partsamerica.com (or use pre-95 2wd pickup rotors)
2 – Toyota Front Outer Wheel Bearings $7.58 Partsamerica.com (recommend replacing)
2 – Toyota Front Inner Wheel Bearings $7.78 Partsamerica.com (recommend replacing)
2 – Toyota Front Inner Wheel Seals $7.78 Partsamerica.com (recommend replacing)
2 – New Cotter Pins n/a (Do NOT reuse old cotter pins)
10 – MM/D50 4x4 Rear Wheel Studs (Optional) $11.80 Partsamerica.com (.29” longer)
TOTAL = $90.34
The swap is straightforward (If you’re just swapping hub assembly go to step 7).
Here’s a diagram for reference, specifically part numbers 1 thru 8.
1) Remove brake caliper and bracket. Then remove MM/D50 hub assembly.
2) Next reassemble the Toyota hub if needed. First press in new outer and inner bearing races. (Note: You will need a bearing race driver kit, which is normally available for loan by most parts stores.)

3) Also, press in studs if needed. I replaced the studs with MM/D50 4x4 rear wheel studs which are over .29” longer then stock. (Note: The MM/D50 and Toyota stock studs are the same length)

4) Install Tacoma rotors onto hub. Reuse Toyota bolts and washer. (Note: MM/D50 rotors use a bolt and nut setup, so they will not work. The Toyota bolts into threaded rotor.)
Here’s a pic of the hubs.

Side view

5) Pack inner bearings with grease and install inner bearings and seals into hub.
6) Pack outer bearings and set aside.
7) Install hub assembly onto spindle.
8) Install outer bearing, MM/D50 spindle washer & nut. Torque nut to 22 ft-lbs, loosen nut, and then retorque nut to 6 ft-lbs. Install new cotter pin. (Note: Do NOT reuse old cotter pins.)
9) Install Toyota hub dust cap. (Note: The MM/D50 cap will not fit.)
10) Reinstall stock caliper and bracket. Check to see if rotor and hub clears bracket. (Note: If you use the Toyota pre-95 2wd pickup rotor, use a 1/16” spacer/washer between spindle and bracket or trim bracket if needed. This needs to be done to center caliper with rotor)


11) Here’s the completed swap.

I've completely redid the front suspension with drop spindles, Toyota front 5-lug conversion, new shocks, urethane bushings, and new calipers.
Here's what I did for my Toyota front 5 lug swap swap.
Needed Reused Parts:
MM/D50 brake dust shield
MM/D50 spindle nuts & washers
Toyota hub dust cap
Toyota bolts for rotor
Parts Needed: Cost: Notes:
2 – Toyota 5-lug front hubs, dust caps, bolts for rotors $23.42 Salvage yard (from pre-95 2wd pickup)
2 – Toyota Tacoma (95-97) Front Rotors $31.98 Partsamerica.com (or use pre-95 2wd pickup rotors)
2 – Toyota Front Outer Wheel Bearings $7.58 Partsamerica.com (recommend replacing)
2 – Toyota Front Inner Wheel Bearings $7.78 Partsamerica.com (recommend replacing)
2 – Toyota Front Inner Wheel Seals $7.78 Partsamerica.com (recommend replacing)
2 – New Cotter Pins n/a (Do NOT reuse old cotter pins)
10 – MM/D50 4x4 Rear Wheel Studs (Optional) $11.80 Partsamerica.com (.29” longer)
TOTAL = $90.34
The swap is straightforward (If you’re just swapping hub assembly go to step 7).
Here’s a diagram for reference, specifically part numbers 1 thru 8.
1) Remove brake caliper and bracket. Then remove MM/D50 hub assembly.
2) Next reassemble the Toyota hub if needed. First press in new outer and inner bearing races. (Note: You will need a bearing race driver kit, which is normally available for loan by most parts stores.)
3) Also, press in studs if needed. I replaced the studs with MM/D50 4x4 rear wheel studs which are over .29” longer then stock. (Note: The MM/D50 and Toyota stock studs are the same length)
4) Install Tacoma rotors onto hub. Reuse Toyota bolts and washer. (Note: MM/D50 rotors use a bolt and nut setup, so they will not work. The Toyota bolts into threaded rotor.)
Here’s a pic of the hubs.
Side view
5) Pack inner bearings with grease and install inner bearings and seals into hub.
6) Pack outer bearings and set aside.
7) Install hub assembly onto spindle.
8) Install outer bearing, MM/D50 spindle washer & nut. Torque nut to 22 ft-lbs, loosen nut, and then retorque nut to 6 ft-lbs. Install new cotter pin. (Note: Do NOT reuse old cotter pins.)
9) Install Toyota hub dust cap. (Note: The MM/D50 cap will not fit.)
10) Reinstall stock caliper and bracket. Check to see if rotor and hub clears bracket. (Note: If you use the Toyota pre-95 2wd pickup rotor, use a 1/16” spacer/washer between spindle and bracket or trim bracket if needed. This needs to be done to center caliper with rotor)
11) Here’s the completed swap.
-
TurboMax - Member
- Posts: 136
- Joined: Sun Jun 28, 2009 6:33 am
- Engine Size: 2.6T
Re: 2.6 (g54b) turbo swap project thread
![]() by TurboMax » Tue Jul 14, 2009 4:51 pm
by TurboMax » Tue Jul 14, 2009 4:51 pm
11/30/07
Installed a used OEM Tach cluster. Pretty much plug and play. I ran a wire directly to from the tach terminal on back of the instrument cluster to the –coil and just moved the wire to the oil pressure switch to the oil pressure sender.
02-06-2008
I picked up the Ford 22mm rear swaybar with brackets at the local u-pull for only $14. It should be easy to adapt to the MM/D50. The swaybar mounts mounted to the axle housing pretty easily. I just needed to move and bend the rear brake lines out of the way. I also had to weld some brackets for the endlinks. The rear swaybar fits nicely..

04-27-08
I added a “push start switch” to the truck. I have push start switches on all my other vehicles, so I went ahead and added one to the truck. I thought I'd post the schematic in case someone needs it. Some may think this is a RICER mod, but it can also act as a cheap theft deterrent system. Especially if you add kill switch to disable the start switch.

06-10-2008
I swapped out the 2" blocks with 3" blocks and replaced the rear shocks.
06-16-2008
Installed a stock Starion center console and a Walmart $3 cup holder.

07-18-2008
Added a key lock to the gas lid for some security.

07-24-2008
I replaced instrument cluster bezel with a 92-94 model bezel.

Installed a used OEM Tach cluster. Pretty much plug and play. I ran a wire directly to from the tach terminal on back of the instrument cluster to the –coil and just moved the wire to the oil pressure switch to the oil pressure sender.
02-06-2008
I picked up the Ford 22mm rear swaybar with brackets at the local u-pull for only $14. It should be easy to adapt to the MM/D50. The swaybar mounts mounted to the axle housing pretty easily. I just needed to move and bend the rear brake lines out of the way. I also had to weld some brackets for the endlinks. The rear swaybar fits nicely..
04-27-08
I added a “push start switch” to the truck. I have push start switches on all my other vehicles, so I went ahead and added one to the truck. I thought I'd post the schematic in case someone needs it. Some may think this is a RICER mod, but it can also act as a cheap theft deterrent system. Especially if you add kill switch to disable the start switch.
06-10-2008
I swapped out the 2" blocks with 3" blocks and replaced the rear shocks.
06-16-2008
Installed a stock Starion center console and a Walmart $3 cup holder.
07-18-2008
Added a key lock to the gas lid for some security.
07-24-2008
I replaced instrument cluster bezel with a 92-94 model bezel.
-
TurboMax - Member
- Posts: 136
- Joined: Sun Jun 28, 2009 6:33 am
- Engine Size: 2.6T
Re: 2.6 (g54b) turbo swap project thread
![]() by Ramit » Tue Jul 14, 2009 7:35 pm
by Ramit » Tue Jul 14, 2009 7:35 pm
 Nice job!

If you love something, set it free. If it comes back to you it's yours to keep.If it doesn't come back, hunt it down..and kill it
-

Ramit - Donator

- Posts: 152
- Joined: Sat Apr 18, 2009 3:45 pm
- Location: Hermitage,TN.
Re: 2.6 (g54b) turbo swap project thread
![]() by RusTy Max » Tue Jul 14, 2009 7:43 pm
by RusTy Max » Tue Jul 14, 2009 7:43 pm
I love posts like this... this is what this site is all about! Good on ya! 

-

RusTy Max - Member
- Posts: 272
- Joined: Wed Sep 09, 2009 7:38 pm
- Location: Lexington, KY
- Engine Size: 2.4L
- What year vehicle do you own?: 1992
Re: 2.6 (g54b) turbo swap project thread
![]() by TurboMax » Tue Jul 14, 2009 7:45 pm
by TurboMax » Tue Jul 14, 2009 7:45 pm
More to come as I pull the info from the old thread.
-
TurboMax - Member
- Posts: 136
- Joined: Sun Jun 28, 2009 6:33 am
- Engine Size: 2.6T
Re: 2.6 (g54b) turbo swap project thread
![]() by Johnboy72 » Thu Jul 16, 2009 6:14 pm
by Johnboy72 » Thu Jul 16, 2009 6:14 pm
Love the Toyota hub swap posts! Very informative!
-
Johnboy72 - VIP
- Posts: 393
- Joined: Wed May 06, 2009 8:36 pm
- Location: Ft. Stewart, GA
48 posts
• Page 1 of 5 • 1, 2, 3, 4, 5
Return to Turbo Builds and Engine Swaps.
Who is online
Users browsing this forum: No registered users and 1 guest