Results 1 to 18 of 18

Thread: First Gen D50 Baja body kits Available now

  1. #1


    Array
    Status
    Offline
    Join Date
    03-16-2011
    Posts
    3,819
    Location

    Sacramento, CA
    Vehicle

    1979 Dodge D-50
    Engine

    Chevy V6

    First Gen D50 Baja body kits Available now

    Now Available First Gen D50. Complete fiberglass Baja Kits or parts of it. You are able to get any, or all of the body parts from my build. Price is listed in a lower post.

    Here is what the cost is from fiberglass Jeff. Pricing does not include shipping.
    Rear bed sides cost $575.00 each Or a full bed set for $1000.00
    Complete Front End $1550.00
    Complete package including left and right rear bedsides and complete front end. $2250.00
    This does NOT include shipping or any hardware. Glass only.. Parts need to be fitted and there is finish body work involved. This is for the glass only. Carbon fiber starts as low as $8300.00 more for the complete package. This depends on the type of carbon fiber used.


    This is cheep in comparison to what it has taken to make just one kit. My cost to produce the plugs, molds, and 1 full kit is around $18500.00 But this is the price you pay to have a one of a kind body. The good news is you get parts with out the cost of the molds.

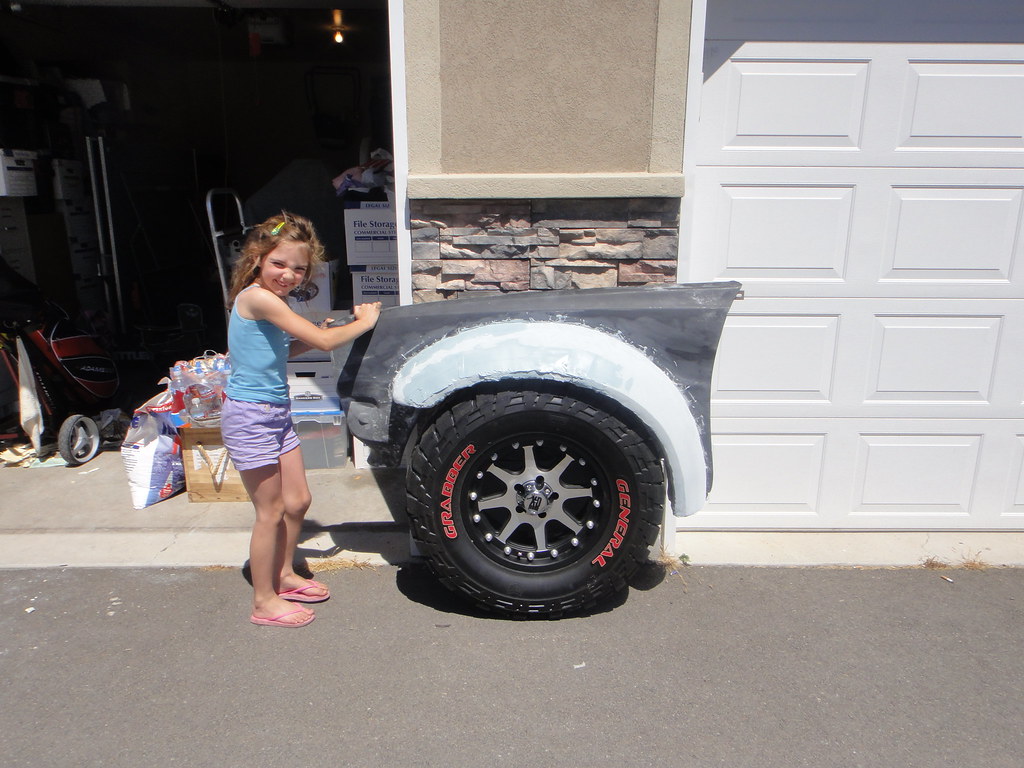
    Rear Bed Sides are cut around the stock wheel well by 2 inches, flared out 5 inches and shortened in the rear by 1 foot. They have plenty of clearance for over sized tires.

    Front hood and fenders. Fenders are now 1/4 the size they were and the hood and flairs widen the front by 14 inches in total. The hood will be a 1 peace, with the 2 quarter fenders.

    These pictures are of the unfinished plugs. I will get the finished pictures up Sunday.

    DSCN4465.jpg


    !cid__07-30-11_1441.jpg !cid__07-30-11_1442.jpg

    Last edited by camoit; 02-17-2016 at 09:49 AM.
    Members come and members go, But the board keeps track of them.
    Find me on FaceBook
    clicking HERE.

    Or look on YouTube Click Here.
    http://mobilemillwright.com

  2. #2


    Array
    Status
    Offline
    Join Date
    03-16-2011
    Posts
    3,819
    Location

    Sacramento, CA
    Vehicle

    1979 Dodge D-50
    Engine

    Chevy V6

    Fiberglass Bed Side Comparison

    Here is what the bed sides will look like. This is only the Plug, not the part.
    The actual part will only be a shell of the out side. Nothing on the inside, just a shell totally open with a 1 inch lip added for strength around the wheel opening.
    I will have pictures of the parts soon.


    DSCN4100.jpg DSCN4104.jpg


    DSCN4116.jpg
    Members come and members go, But the board keeps track of them.
    Find me on FaceBook
    clicking HERE.

    Or look on YouTube Click Here.
    http://mobilemillwright.com

  3. #3

    Array
    Status
    Offline
    Join Date
    08-25-2011
    Posts
    84
    Location

    Las Vegas, NV
    Vehicle

    1989 Mitsubishi Mighty Max
    can't wait to see the finished product

  4. #4

    Array
    Status
    Offline
    Join Date
    03-26-2011
    Posts
    113
    Location

    British Columbia, Canada
    Vehicle

    1986 Dodge D-50
    Engine

    Please Select Your Engine Type
    I noticed the body lines of the original parts were skillfully carried over to work with the look of the new parts. Fantastic work.

    -RHP

  5. #5


    Array
    Status
    Offline
    Join Date
    03-16-2011
    Posts
    3,819
    Location

    Sacramento, CA
    Vehicle

    1979 Dodge D-50
    Engine

    Chevy V6
    Quote Originally Posted by parrell456 View Post
    I noticed the body lines of the original parts were skillfully carried over to work with the look of the new parts. Fantastic work.

    -RHP
    Thank you for the comment. It really means a lot when up against a truck like yours. Mabe we can meat up some day for side by side picts.

    Since she is a D50 with a major over dose of steroids and has been working out in the gym the body has changed. The lines are only in some places and not in others. Like the very rear looses the but crack down the middle but still has the upper radius to show off them sexy hips. While the front end gets Brest implants and a face lift.
    Members come and members go, But the board keeps track of them.
    Find me on FaceBook
    clicking HERE.

    Or look on YouTube Click Here.
    http://mobilemillwright.com

  6. #6


    Array
    Status
    Offline
    Join Date
    03-16-2011
    Posts
    3,819
    Location

    Sacramento, CA
    Vehicle

    1979 Dodge D-50
    Engine

    Chevy V6
    One peace hood weight :26 Lbs.
    Front quarter fenders weight: 2 Lbs each
    Rear bed side weight: 13.5 Lbs each.
    That makes a total of 57 Lbs for all the parts.
    Will add in pictures later on.

    True race parts weight is about 1/2 of what I have. There made for street use. Race parts are known as a splash part. Thats why they just seem to blow up during a race. There designed that way.
    Last edited by camoit; 11-13-2011 at 04:55 PM.
    Members come and members go, But the board keeps track of them.
    Find me on FaceBook
    clicking HERE.

    Or look on YouTube Click Here.
    http://mobilemillwright.com

  7. #7


    Array
    Status
    Offline
    Join Date
    03-16-2011
    Posts
    3,819
    Location

    Sacramento, CA
    Vehicle

    1979 Dodge D-50
    Engine

    Chevy V6

    Finished parts.

    Here is what the cost is from fiberglass Jeff. Pricing does not include shipping.

    Rear bed sides cost $575.00 each Or a full bed set for $1000.00
    Complete Front End $1550.00
    Complete package including left and right rear bedsides and complete front end. $2250.00
    This does NOT include shipping or any hardware. Glass only.. Parts need to be fitted and there is finish body work involved. This is for the glass only. Carbon fiber starts as low as $8300.00 more for the complete package. This depends on the type of carbon fiber used.


    DSCN4480.JPG DSCN4460.JPG

    DSCN4464.jpg DSCN4462.jpg

    DSCN4481.jpg DSCN4470.jpg

    DSCN4461.jpg DSCN4478.jpg

    DSCN4465.jpg DSCN4467.jpg

    DSCN4318.jpg DSCN4436.JPG

    DSCN4432.JPG
    Last edited by camoit; 11-26-2011 at 09:27 PM.
    Members come and members go, But the board keeps track of them.
    Find me on FaceBook
    clicking HERE.

    Or look on YouTube Click Here.
    http://mobilemillwright.com

  8. #8


    Array
    Status
    Offline
    Join Date
    08-31-2011
    Posts
    832
    Location

    Calgary, Alberta, Canada
    Vehicle

    1981 Dodge D-50
    Engine

    Ford V8
    Now get a real big antenna and put it on top, then take some card board box's and make a huge radio control unit, place beside the truck and take a pic

  9. #9


    Array
    Status
    Offline
    Join Date
    03-16-2011
    Posts
    3,819
    Location

    Sacramento, CA
    Vehicle

    1979 Dodge D-50
    Engine

    Chevy V6
    I had a 102 inch steel CB antenna on the camo truck for a long time. I was able to break lots of florescent lights at drive through and gas stations. Just drive through in second gear and I could turn the place dark. It was pretty funny.
    Members come and members go, But the board keeps track of them.
    Find me on FaceBook
    clicking HERE.

    Or look on YouTube Click Here.
    http://mobilemillwright.com

  10. #10

    Array
    Status
    Offline
    Join Date
    03-26-2011
    Posts
    90
    Location

    Farmington, UT
    Vehicle

    1983 Mitsubishi Mighty Max
    Engine

    4D56-T
    Very interesting, this is much different than the fiberglass parts I am working on. Yours is much more extreme than what I am going for. I am retaining the hood and bedsides and go with full fiberglass front fenders and some 5" fiberglass flares for the bed. I have really opened up the front wheel wells and the rears are already capable of stuffing a 35". The OEM front fenders were so small that you would experience rubbing even with a 30" tire. I am trying my hardest to make my fenders look 100% stock.

    Last edited by 4D55 Performance; 11-26-2011 at 01:04 AM.

  11. #11


    Array
    Status
    Offline
    Join Date
    03-20-2011
    Posts
    4,857
    Location

    Pittsburgh, PA
    Vehicle

    1980 Dodge D-50
    Engine

    G54B
    How did you do the flares on the rear of the 1st gen - metal or glass?
    Pennyman1
    The best Dodge that Dodge never made
    Living the D-50 lifestyle since 1980

  12. #12


    Array
    Status
    Offline
    Join Date
    03-16-2011
    Posts
    3,819
    Location

    Sacramento, CA
    Vehicle

    1979 Dodge D-50
    Engine

    Chevy V6
    Mine is a 7 inch flair, but the truck is now 1.5 foot wider in the front end. The wheels still stick out side the flair by 4.5 inches at mid travel. One thing to keep in mind is the stock fenders are crap and there is a real good chance they will not survive the mold process. Mine folded like paper at the bottom near the door. Have you done many molds? In by build thread I show some tricks on the flanging process. Just look closely at the pictures.

    It would be nice if you flange the mold around the flair it's self, before doing the rest of the fender. This way you can make just a flair or complete fender and flair. It might be worth the extra day just to give your self the option. Then you can sell the flair as a bolt on option for stock fenders. It just makes the mold more versatile for you. You would have somthing like a 7 peace mold when done. Mine is 6 just for what would be 1 fender if it was stock. Next year it might be a full stock fiberglass cab out sides.
    Members come and members go, But the board keeps track of them.
    Find me on FaceBook
    clicking HERE.

    Or look on YouTube Click Here.
    http://mobilemillwright.com

  13. #13


    Array
    Status
    Offline
    Join Date
    03-16-2011
    Posts
    3,819
    Location

    Sacramento, CA
    Vehicle

    1979 Dodge D-50
    Engine

    Chevy V6
    Quote Originally Posted by pennyman1 View Post
    How did you do the flares on the rear of the 1st gen - metal or glass?
    On mine, the first thing that was done was to shorten the bed by 1 foot. Then cut the opening larger and weld in sheet metal to the width it was going to be. Next came a cardboard dam around the hole bed side about 8 inches high. 2 part, 4 pound expanding foam over the hole thing. Sand to rough shape. Fill in all the BIG holes with bondo and cover with 2 layers of glass to make a hard shell. Then it's the basic finish work after that to make the final shape. I go into a lot of detail in my build thread. Parts 1 and 2 on the molding.
    Members come and members go, But the board keeps track of them.
    Find me on FaceBook
    clicking HERE.

    Or look on YouTube Click Here.
    http://mobilemillwright.com

  14. #14

    Array
    Status
    Offline
    Join Date
    03-26-2011
    Posts
    90
    Location

    Farmington, UT
    Vehicle

    1983 Mitsubishi Mighty Max
    Engine

    4D56-T
    Thanks for the tip but the front fenders that I am pulling my mold from are glass fenders so I will not have any issues with them surviving the process. I agree the OEM fenders are pretty weak in spots. My front fenders will provide 5.5" of coverage.

    I am making my rear flares out of glass as well.

  15. #15

    Array
    Status
    Offline
    Join Date
    03-26-2011
    Posts
    90
    Location

    Farmington, UT
    Vehicle

    1983 Mitsubishi Mighty Max
    Engine

    4D56-T
    Quote Originally Posted by camoit View Post
    On mine, the first thing that was done was to shorten the bed by 1 foot. Then cut the opening larger and weld in sheet metal to the width it was going to be. Next came a cardboard dam around the hole bed side about 8 inches high. 2 part, 4 pound expanding foam over the hole thing. Sand to rough shape. Fill in all the BIG holes with bondo and cover with 2 layers of glass to make a hard shell. Then it's the basic finish work after that to make the final shape. I go into a lot of detail in my build thread. Parts 1 and 2 on the molding.

    I have tried a lot of different foams and taxidermy foam is the trick. It cures in 5 minutes, it leave very small holes, and it does not shrink at all like other POS foam products. It's also much easier to work with and shape.

  16. #16


    Array
    Status
    Offline
    Join Date
    03-16-2011
    Posts
    3,819
    Location

    Sacramento, CA
    Vehicle

    1979 Dodge D-50
    Engine

    Chevy V6
    How much is the cost on it, and how sticky is it? I used a 5 gallon kit on my project. I think next time I will take the parts over to the spray foam insulator guys that spray houses and have them lay it on. It makes for a more uniform coverage and expansion. It would have saved time and money just to have them spray it when there doing a house. $20.00 cash and Jose would have had it done in a flash.
    Members come and members go, But the board keeps track of them.
    Find me on FaceBook
    clicking HERE.

    Or look on YouTube Click Here.
    http://mobilemillwright.com

  17. #17


    Array
    Status
    Offline
    Join Date
    04-26-2011
    Posts
    251
    Location

    Charlotte, NC
    Vehicle

    1987 Dodge Power Ram 50
    Engine

    G54B
    What fantastic work fellas!

  18. #18

    Array
    Status
    Offline
    Join Date
    04-20-2014
    Posts
    22
    Location

    Tampa Florida
    Vehicle

    1987 Mitsubishi Mighty Max
    Engine

    G54B
    Is this still available?

Tags for this Thread

Bookmarks

Bookmarks

Posting Permissions

  • You may not post new threads
  • You may not post replies
  • You may not post attachments
  • You may not edit your posts
  •